Wednesday, October 20, 2010

The series of Experiment using Minifors Bioreactor

Hai all.  We are from Group 1 . Here are our Group Members :

Gary Hor Kok Chiu
Fakhrul Ikhma
 Che Nurul Azieyan
 Harniza
 Erna
Cik Nabilah

Do you want to view our work in our beloved laboratory using bioreactor?  
you can click the links below:


Day 4: Goobye, Mr. Bioreactor… For Now.

After having taken the samples at the respective time intervals from the afternoon on Day 3 to the afternoon on Day 4, it was finally time to shut down and clean up the bioreactor. Surely, we cannot expect it to magically clean itself up, can we? We were initially planning to hire “helpers” but being the diligent students as we are (of course!), we decided to rally and work together to clean up the bioreactor instead. 

So before we began dismantling the fermentor, it was important to take the necessary precautions to ensure that there will be no mishaps or problems encountered. With the tutelage and guidance from Mr. Shaman, we were able to follow through in taking apart the bioreactor for cleaning. First, we have to stop any feeding of reagents such as the base and antifoam into the fermentor. Next, reduce the stirring of the agitator and subsequently switching it off after the speed of impeller had been significantly reduced. After which, any remote control from the Iris software is switched off as seen from the panel.

REMOVE ALL THE CONNECTION LINE BETWEEN THE BASE UNIT AND THE VESSEL...

REMOVE THE VESSEL FROM THE BASE UNIT...

Next, the reagent bottle lines were emptied and the reagents that is the base solution and the antifoam were carefully removed from the bioreactor. The reagent lines were then washed and the process of reassembling the whole bioreactor can take place. It should be reminded that the pH and pO2 probes were removed first from the top plate before lifting the entire plate from the fermentor. The vessel was emptied and was rinsed thoroughly.

DISPOSAL THE FERMENTATION CULTURE..
For the disposal of the culture. We just dispose it into the sink because we only use Saccharomyces Cerevisiae,which is wild type and not harmful to the environment.

WASHED ALL THE COMPARTMENT OF THE BIOREACTOR..


AFTER FINISH WASHING...LETS IT DRY..

The parts of the reassembled bioreactor were left to dry before keeping them in storage. And with that, it was time to say goodbye to the bioreactor until next time. After almost a week’s worth of work, it was high time that it deserved a long vacation in storage which probably was not an ideal place for some R&R in the first place. A five-star establishment was not within our budget to begin with. Oh well, Mr. Bioreactor has to make do with what was offered to him.

P.S. A message from Mr. Bioreactor: If anyone is interested in accompanying Mr. Bioreactor on a vacation to an exotic (albeit dark) storage location, sound off in the comments below. 

day 3:Result

OUR GROUP RESULT


table for the OD and glucose values..


figure 1 : The Graph OD reading at the abs 600nm  againts time


Based on the graph ,its shown the growth of Saccharomyces Cerevisiae.the beginning of this graph is represent the lag phase,at this stage lag phase is not longer. why lag phase is not longer? Because it is not much adaptation to the cell,we already used the same media to inoculate them, so that they don’t have any longer time to adapt with new environment.
After that the graph curve show the growth rapidly, this is due to the growth of Saccharomyces Cerevisiae that have consumed the glucose supply in the fermenter.
The graph curve after that shown the decreasing, this can tell us that Saccharomyces Cerevisiae consumed the glucose and the glucose level in the fermenter was decreasing, so that the curve also decrease, because  most of the cell was die. The consumption of glucose at this stage is at maximum level. so the cell need to competed among themselves.
The amount of glucose become limited, the growth will be decreasing, because of more cell tend to die and only the cell that survive will competed the consumptions of glucose.
However if we supply the glucose at this stage, we see the curve will rapidly increase again.in the fermenter. The temperature was increase because cells themselves also produce heat and to check the contamination of our culture growth ,we may check under the microscope,wheather there are contamination or not.


GRAPH OF THE BIOREACTOR  (Iris)


The fermenter is connected to the window, IRIS.List of available process variable is shown from which individual parameter. Different bioreactor can have different group of parameter associated with them according to the specification.
The on- line graph shows the actual data in real time.OD and a different screen opens to that shown for measured parameters. Oxygen are the most important thing to growth the cell, as oxygen is being consumed by the yeast, oxygen level become decreasing, so that the agitation will be faster to supply enough oxygen to the cell. So that the yeast would not die.

The line for the temperature would also increase because of cell itself produce heat. A red time line can be moved along ,wherever the line intersects the graph data point the value for each parameter at that time are displayed. The bar graph will be changed accordingly

its shown how the system run : fermenter direcly connected with the software

Day 3: Time for inoculation and sampling


Inoculation:


    For the day 3,  we have done our inoculation using minifors bioreactor. But we have to consider the proper steps to ensure our inoculation nicely done. Remember, all the steps must be followed!!

How to start inoculation?

  • First, you have to sterilize your hands which have been covering with gloves with 70% ethanol. REMEMBER: it necessary to keep in sterilizes condition. 
  • Before we continue our inoculation, the bioreactor must be set up at 700 rpm (speed of agitator). Then, the injections of nitrogen gas are done to remove oxygen in the bioreactor. 
  • After that, we spray the inoculation tube and inoculation flask with 70% ethanol. The clamp and silicone tube are opened. 
  • Remove the foil cover from flask and the inoculums were pour quickly into the vessels of bioreactors. 
  • The port closure was placed onto the vessel top plate to cover the hole dan screw it down until hand tight. 
  • The process was started.


       SAMPLING

      Taking a sample without letting contaminants get into the vessel is simple if we follow the steps below:

      1.   The sample device will normally be closed off from the vessel by  clamp on the silicone tubing leading to a pipe in the vessel
      2.   The clamp is removed
      3.   A syringe is fitted to the air filter connected to the short pipe on the head plate of the sample device
      4.   Pull back on the syringe plunger to draw culture into the sample bottle
      5.   When the sample has reached 2/3 full of the bottle, push down on the syringe plunger to return culture int the tubing into the vessel.
      6.   Clamp the tubing closed again and the sample was take out by syringe.to the empty tube


          The reading of the sample ware taken every two hours starting from 12.50 p.m to 10.50 a.m. This sampling activity done almost 12 hours. The optical density of the sample was measured via Spectrophotometer at 600nm and glucose level was measured via glucose detector. Based on the results, the graph have been constructed.

      Day 2: Preparation of fermentation

      The second day of our preparation for fermentation start with the innoculation 1 colony of S.cerevisiae into innoculation medium.The meduim then was incubated in incubated shaker for 30C ,200 rpm and 24 hour.But don't forget to strelize the working area with 70% lysol.


      The fermentation medium was ready in incubator shaker to be incubated overnight


      FIRSTLY, STERILE THE WORKING AREA.

      STEP TO INOCULATE THE YEAST...
      After that,we prepared the fermentation medium that is 1% yeast extract,2% peptone,2% glucose with addition of 1.5 L distilled water.The mixture need to be mix properly before was poured into the fermenter vessel.The fermenter vessel that had ready with the ferementation medium then will be put onto the minifors to made an calibration for pH 4 and pH 7 using a pH 4 and pH 7 buffer respectively..

      STEP FOR MEDIA PREPARATION
      For next preparation of fermentation,we had done a calibration of pH electrode.This is the process to made an calibartion for pH electrod:

      1 ) the silicon that was cover the tip of the electrode was removed.
      2 ) the calibration option was put at high pH that is 7
      3 ) the pH 4 buffer was prepared for calibration before the tip of probe was immersed in pH 7 until the we got the stable reading to ensure we got the right calibration.While the pH probe was immersed,the temperature probe also was immersed to ensure we got the right pH because pH nad temperature was react relatively.
      4 ) the probe that was used to calibrate ph 7 was wash with distilled water
      5) the ph 4 buffer was prepared for next calibration that was pH 4 calibration.The same thing was done as we made a pH 7 calibration before.
       6) The electrode was placed back on the ferementer after the calibration done and the ENTER was press.

       The pH and temperature probes was immersed in buffer  for calibration

      Beside pH probe,pO2 probe also was put together in our fermentor.In this step,we have to unscrewed the metal section that was at the bottom.This step was crucial because we need to ensure there was no electrolyte inside the catridge membrane.More than that,this company was also provide a top up for a liqiud electrolyte if the the electrolyte level was low before the vessel with a ready pH and pO2 probe was fit onto the fermentor

      Next,we all had prepared an antifoam reagent by inserting the antifoam into 250 ml bottle.In this process we have to ensure the tip wasreally connected with the metal pipe on the head plate and also need to ensure the clamp between the botle was clamped off.

      The last step in preparaion of fermentor was an autoclaving process.But,before the autoclaving process,we need to check wether all the equipment like inlet filter was already connected with sparger or not, innoculation port and sampling bottle.Besides that,all the part that have directly exposed to the environment need to be foiled with aluminium to ensure the fermentor was remain sterile even after taking it out from autoclave.

        The fermentor with all ready probes including antifoam was ready for autoclaving process.

      Monday, October 18, 2010

      Day 1: Its all begin from this day ...

      DAY 1......

      Precisely at 1 o'clock, we walked to the room 148... Our lovely laboratory... When we reach the room.. There was already one bioreactor being install by the coordinator... The bioreactor we used is the 2 liters bioreactor imported by INFORS HT, Switzerland...


      The bioreactor that already install by the coordinator before we came to the laboratory...


      While waiting for the coordinator.. We take our time to take a look the bioreactor.. Compared it from what we learn from the theory classes...

      This is our cool coordinator.. Mr.Shaman Gaspar.. He were with us for the whole week teaching us on how to make used of the bioreactor correctly...


      Mr.Shaman is giving some information about the INFORS HT company and the bioreactor itself...


      The very first thing we need to do that day.. Is unpack the box of the bioreactor.. Take out the bioreactor and put all the components onto the bioreactor...

      What is bioreactor/ fermenter???
      Bioreactor function is to provide cells and microorganisms cultivated in it with the most optimal condition for vital capacity...

      What is the function each of the components in the bioreactor???


      2 LITERS BIOREACTOR...

      Syringe: To suck out the sample from the vessel...

      Vessel holder: To hold the vessel and reagent bottles (min 2,max 4)

      Antifoam reagent: Prevent formation of roaming during fermentation

      Base reagent: Use to raise up the pH when it too low (acidic)


      BASE UNIT...


      Operating panel: Menu button to choose all the parameter needed...

      Temperature line: To take the temperature in the vessel...

      pH line: Connect to pH probe...

      pO2 line: Connect to O2 probe...

      Antifoam line:
      1. Black-to the vessel...
      2. Red -to the antifoam probe...
      Motor: Supply the power to rotate the impeller movement...
      *The motor is located within the base unit... The connection to the vessel is simply lifted for removal and replaced for operation...


      BACK OF THE BASE UNIT...

      OPERATING PANEL...


      Vessel holder: To support the vessel and reagent bottles...

      Reagent bottle: Use for bases,acid,feed and antifoam.. But for our experiment we only use two bottle reagent for base and antifoam... we do not need feed reagent bottle because we only do a batch fermentation... We do not use acid during the fermentation because the yeast (Saccharomyces Cerevisiae) itself producing acid...


      Rotameter: Manually controlling the amount of air entering the vessel... can be used from 0 l/min to 5 l/min...

      Air compressor: Air supply...


      SAMPLE BOTTLE...
      Sample bottle: Collect the sample during fermentation to make a test...


      HEAD PLATE...
      Head plate:

      1. To get information out of the vessel (pH,O2,temperature...)
      2. To get material into or out the vessel (acid,base,nutrients,sample...)
      COMPONENTS IN VESSEL..

      Sparger:

      1. Gases for the maintenance of dissolved oxygen... 
      2. Introducing pressurized gas to the fluid through a sparger, which usually have small holes that break the incoming gas into fines bubbles...


      Impeller:

      1. Six-blade disc impeller--->the type of impeller in our bioreactor...
      2. To diminish the size of air bubble to give a bigger inter-facial area for oxygen transfer and to decrease the diffusion path...
      3. To maintain a uniform environment throughout the vessel contents...


      CLOSE UP OF THE VESSEL

      Vessel: Non-jacketed glass vessel place for media...

      Baffles:

      1. To prevent liquid swirl (vortex) and thereby enable the impeller to impose power on the liquid in the form of turbulence and flow...
      2. To improve aeration efficiency...

      Harvest line: To harvest the product...


      CONDENSER...

      Condenser: To cool the liquid in the air outlet resulting in the separation of the foam and other liquid particles..

      Exit gas cooler with filter: Sterile the air before going out to the environment...

      Inlet filter connected to the Sparger: Sterile air enter the bioreactor...


      PROBES...
      pH probe & O2 probe: Both probes used to control and maintain the pH and dissolved oxygen parameters at the optimal level...


      Then, the last thing we need to do in the first day is to prepare 200ml media for the seed culture...
      The ingredient use in the YPEG media are:

      1. Yeast Extract 1%
      2. Glucose         2%
      3. Peptone         2%
      To prepare for 200ml media... Used 2ml Yeast Extract, 4ml Glucose, 4ml Peptone and 200ml distilled water... 

      INGREDIENT USE FOR THE MEDIA...
      PREPARATION TO MAKE MEDIA...

      WEIGHING THE INGREDIENTS USED...
      We weighed all the ingredients used to make the media by using the analytical balance...


      BEFORE AND AFTER MIXING...
      Then, pour all the ingredients and distilled water and dissolved it using magnetic stirrer...


      After mixing, we put the cotton into the mouth of the conical flask and wrapped it with aluminium foil... 


      AUTOCLAVE...

      Next we autoclave the media... 121 Degree Celsius within 15 min...

      Why 15 min not more than 15 min???
      Because if more than 15 min the glucose will caramelize...

      What next after autoclaving???
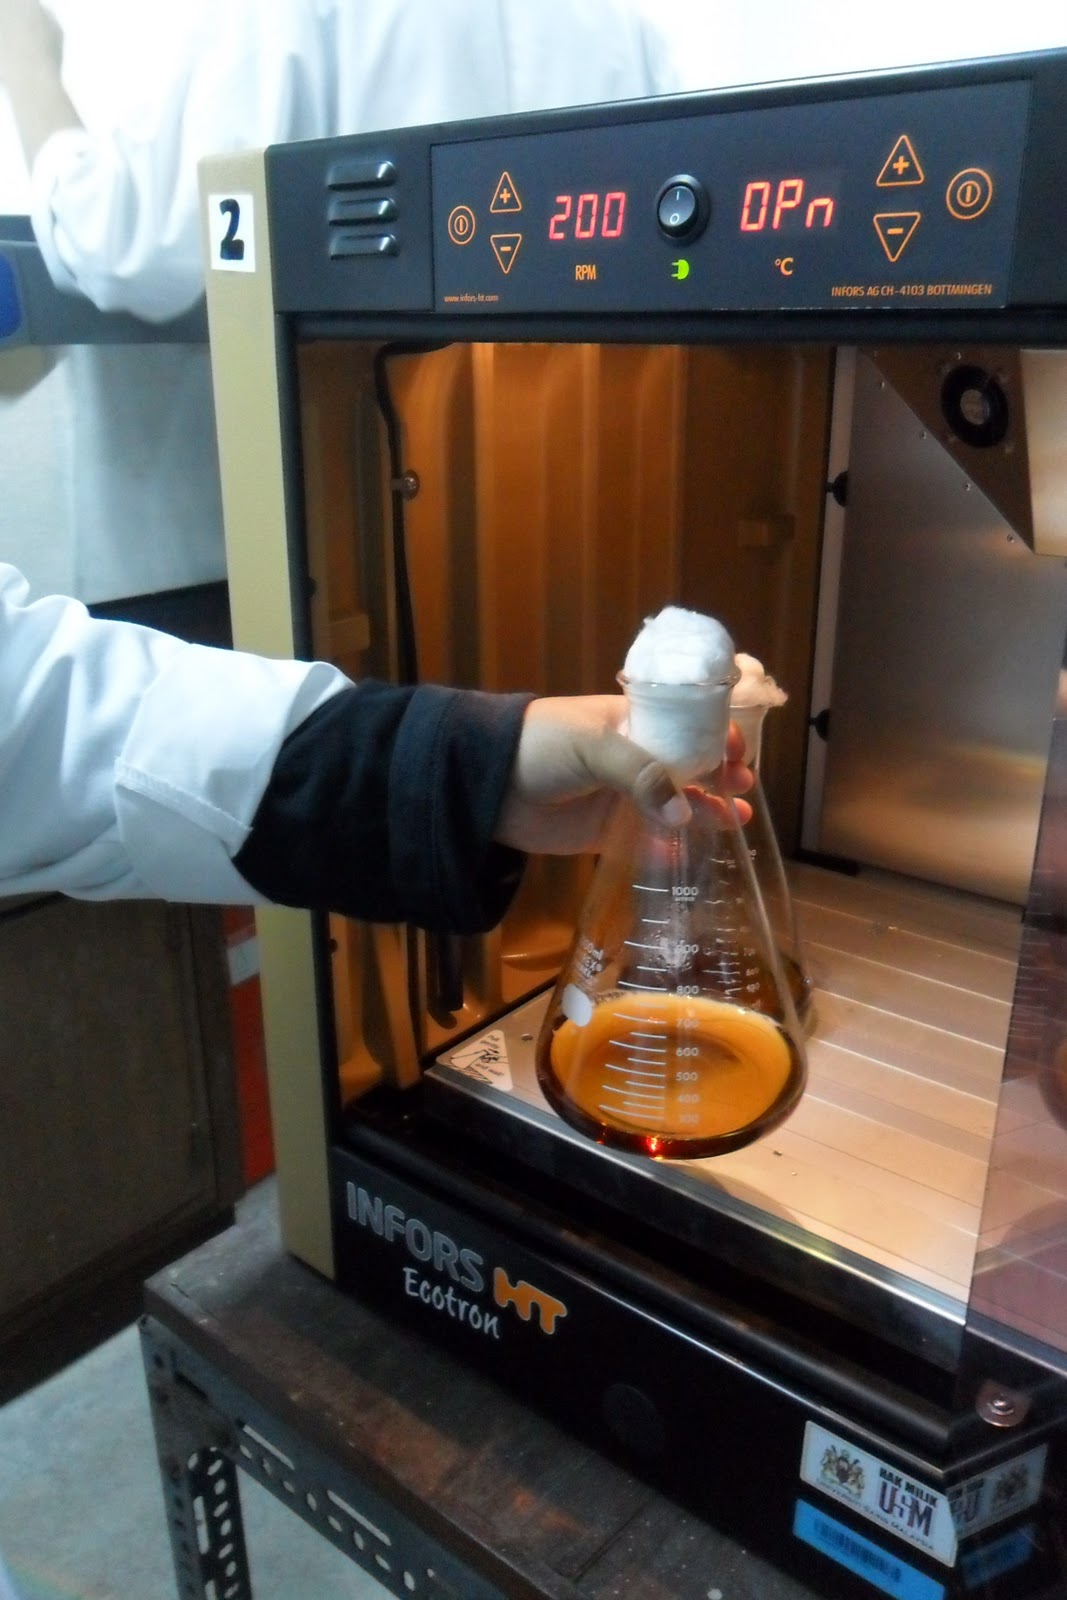
      INCUBATOR SHAKER...

      Lastly, we put it in the incubator shaker 200rpm, 30 Degree Celsius to used it for inoculation process next day........

      Thursday, October 14, 2010

      Overview of our experiment

      Objective
      After performing this experiment we should be able:
      • To describe well about every part of bioreactor component
      •  To understand basic steps in bioreactor preparation
      •  To handle basic operation procedure of a bioreactor
      • To carrying out of yeast ( Saccharomyces cerevisiae ) fermentation using batch mode
      • To conduct an analysis on determination of the cell concentration and measuring glucose uptake by yeast
      • To monitor fermentation profile and behavior

      What is actually happened during our practical class?

               (Day 1) 
      ·         Unpack the bioreactor that just arrived from Swiss. Very far isn’t it??
      ·         Familiarization with the Bioreactor and its Operation conducted by our coordinator, Mr. Shaman from Infors.
      ·         Seed Culture Preparation
             (Day 2) 
      ·         Equipment and media sterilization. 
         (Day 3) 
      ·         Inoculation, fermentation and monitoring.
      ·         Sampling. Came to our lab at midnight & early in the morning.
      ·         Lunch together at KFC. The most exciting & enjoyable moment.
         (Day 4)
      ·         Fermentation stop
      ·         Cleaning and washing
      ·         Fermentation profile analysis using IRIS software


      Introduction

      Our experiment is on carry on as below:


      Figure 1: Overview flow chart of fermentation step


      We are using Minifors fermenter that is made by Swiss Company name Infors. The fermenter system consist the basic usual process parameters for fermentation.

        • Stirrer speed (rpm)
        • Temperature
        • pH
        • pO2
        • Antifoam/level
        • Feed
        • PC Software: Iris


      Figure 2: Minifors fermenter


      Saccharomyces cerevisiae is used in this practical class and commonly known as "baker’s yeast" or "brewer’s yeast". The yeast ferments sugars present in medium, giving off carbon dioxide (CO2) and alcohol (ethanol).

      Figure 3: Glucose utilization pathway of Saccharomyces cerevisiae


      Explain the purpose of each ingredient found in the YPEG media.

      The ingredients found in the YPEG media are:

      ·         Yeast extract                                       1 %
      ·         Peptone                                               2 %
      ·         Glucose                                               2 %
      ·         Added with dH2O.


      Peptone contains amino acids that promote to the growing of the cells.

      Yeast extract is used to provide organic compounds, vitamins and certain trace elements that helpful for yeast growth.

      Glucose is a simple form of sugar, serve as a carbon sources for the yeast.

      Distilled water is used to suspend the solids to dissolve it.


      Why is it to calibrate the pH probe?

      Calibration of the pH probe is used in 2 different buffer solutions (pH 7 and pH 4) to ensure the success of the pH measurement and proper subsequent maintenance of the probe.